经过许多个冬天之后,我才渐渐明白自己再躲不过雪,无论我蜷缩在屋子里,还是远在冬天的另一个地方,纷纷扬扬的雪,都会落在我正经历的一段岁月里。当一个人的岁月像荒野一样敞开时,他便无法照管好自己,落在一个人一生中的雪,我们不能全部看见,每个人都在自己的生命中,孤独地过冬。
——刘亮程《寒风吹彻》
简介
- 最近想重新折腾一下
Swift的服务端开发,为什么说是重新折腾呢?因为我在年初(大概是1月份)的时候就已经折腾过了,照着别人的教程体验了一下Swift开发服务端,使用的是加拿大的一个开发小组孵化的开源服务端框架Perfect。 - 但是,体验完就尘封了,一如之前的Swift学习,间歇性的😂。而且那时候还没真正用
Swift开发过项目,所以对一些Swift的高级语法和特性还不是很熟悉,所以,这个锅是Swift的,我不背🌚🌚。 - 最近突然想换体验一下其他端的开发思路,嗯、是的,很突然🌝。所以就想把一些学习记录和踩坑过程记录下来。
- 因为我之前已经安装过
Mac端的MySQL,但是还是想在这里总结记录一下。
正文
MySQL安装可以直接去官网下载安装包下载,也可以使用homebrew安装,但是我实在是记不起我之前是用哪一种方式安装的了。不过,鉴于我这么懒,应该是使用的homebrew🤣🤪。- 但是这里、两种安装方式我都会介绍。
手动安装
下载安装MySQL
首先去MySQL官网下载安装包。
- 截止目前最新版本是
MySQL Community Server 8.0.12,但是后面使用Perfect开发的时候,8.0.12会出现问题,所以推荐使用5.7.23 下载
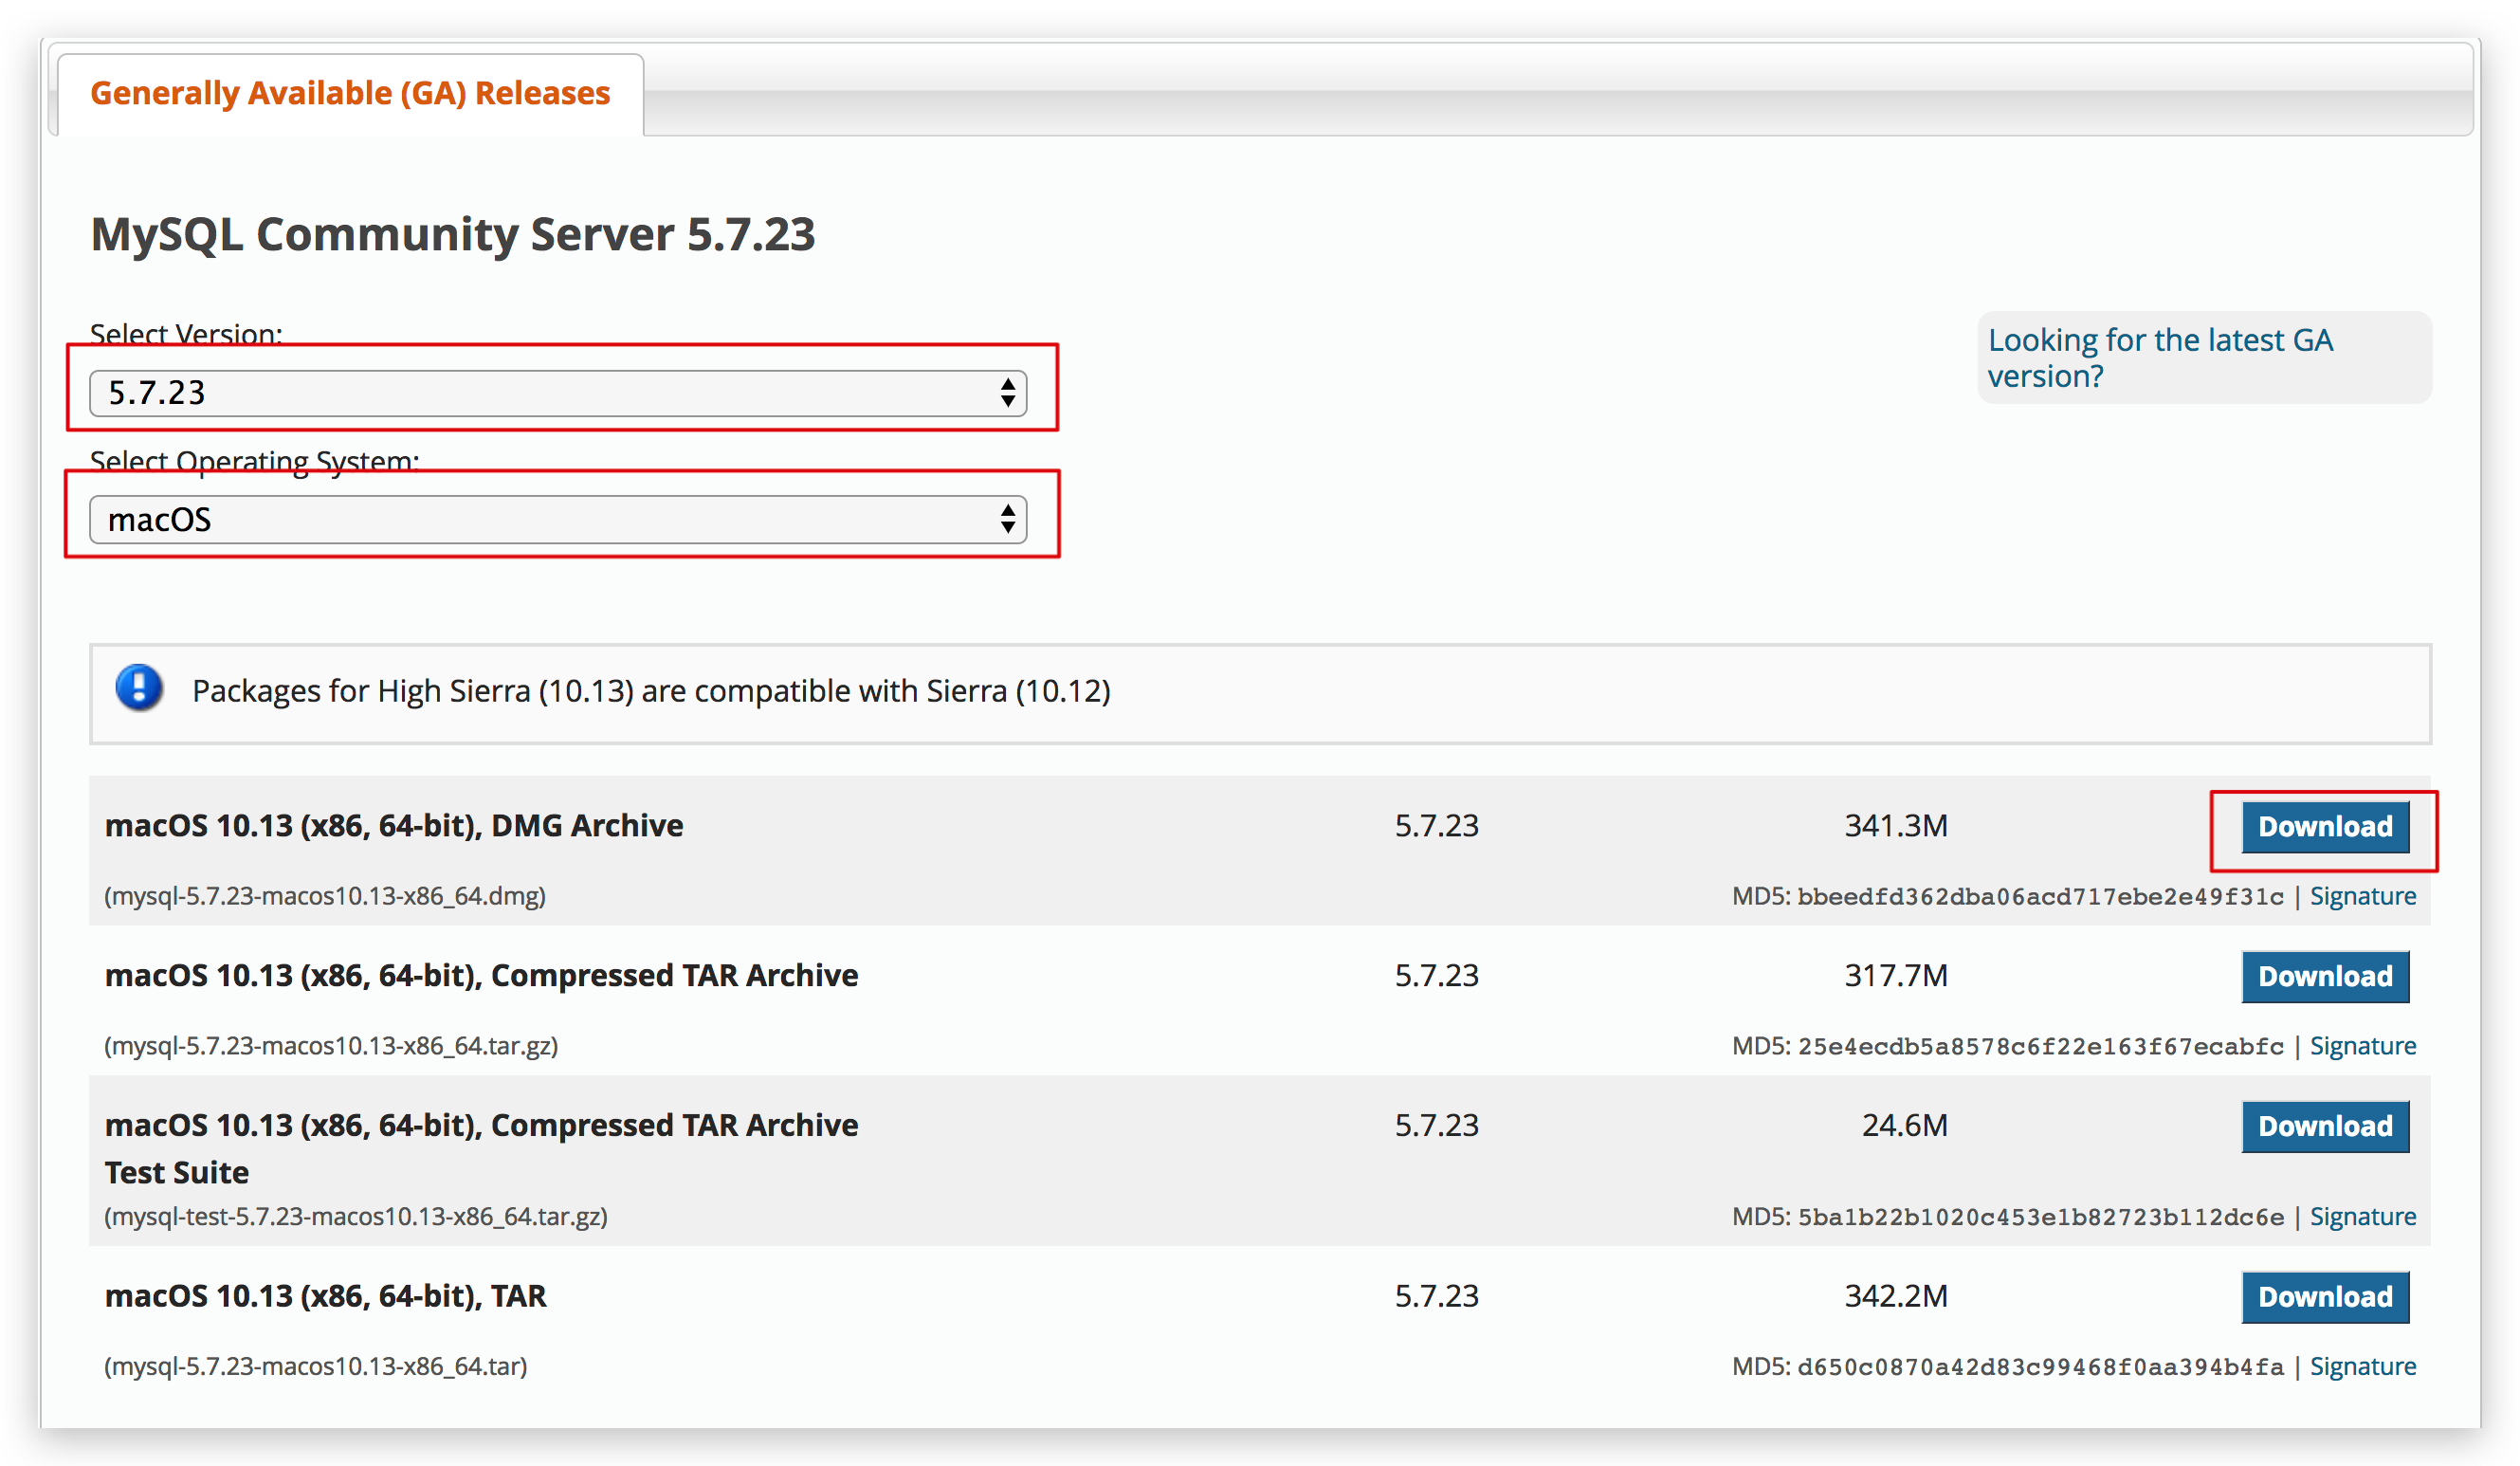
5.7.23版本步骤如下: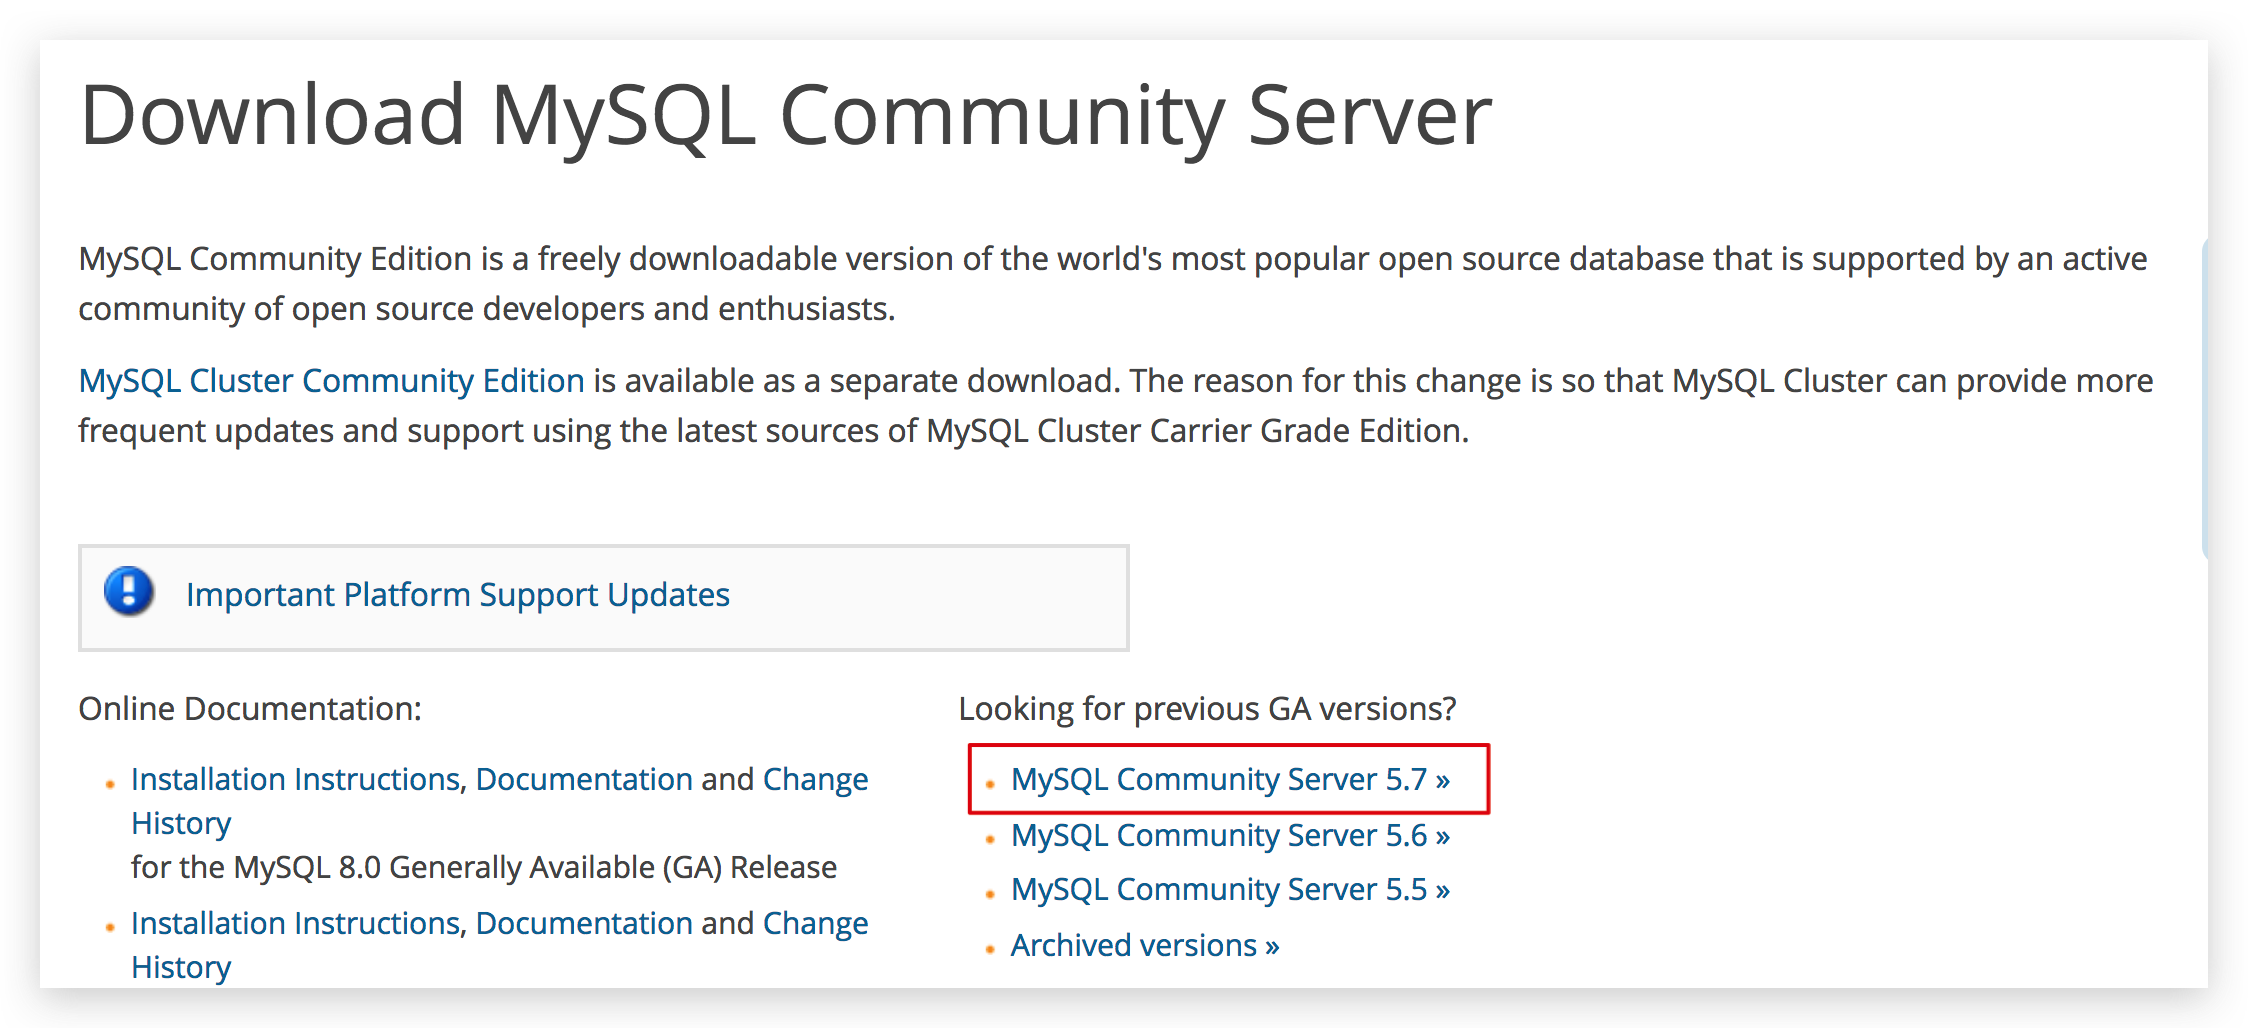
- 截止目前最新版本是
下载完成后,双击打开进行安装,按步骤一步一步的安装即可。
注意最后一步,会有一个弹框,里面有默认生成的随机密码,记得保存,后面会用到。- 密码在:
root@localhost:xxxxxxxx
查看是否安装成功
打开系统偏好设置,最下面会出现
MySQL图标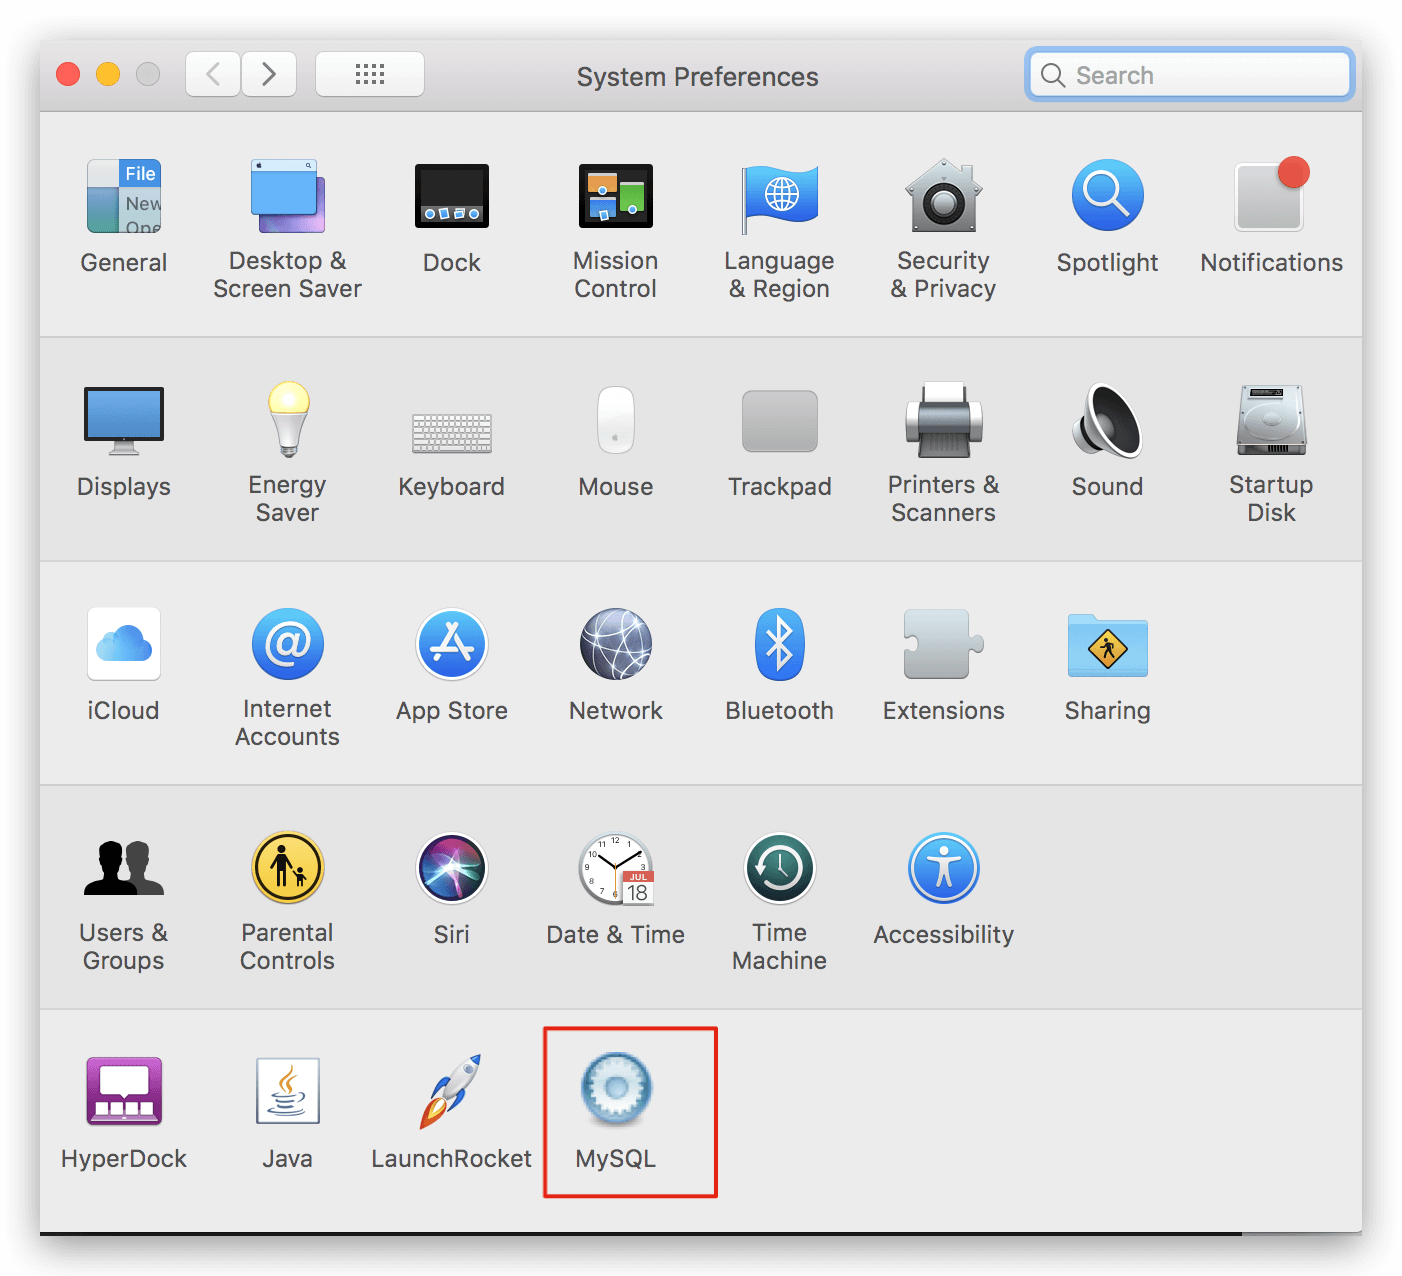
开启
MySQL服务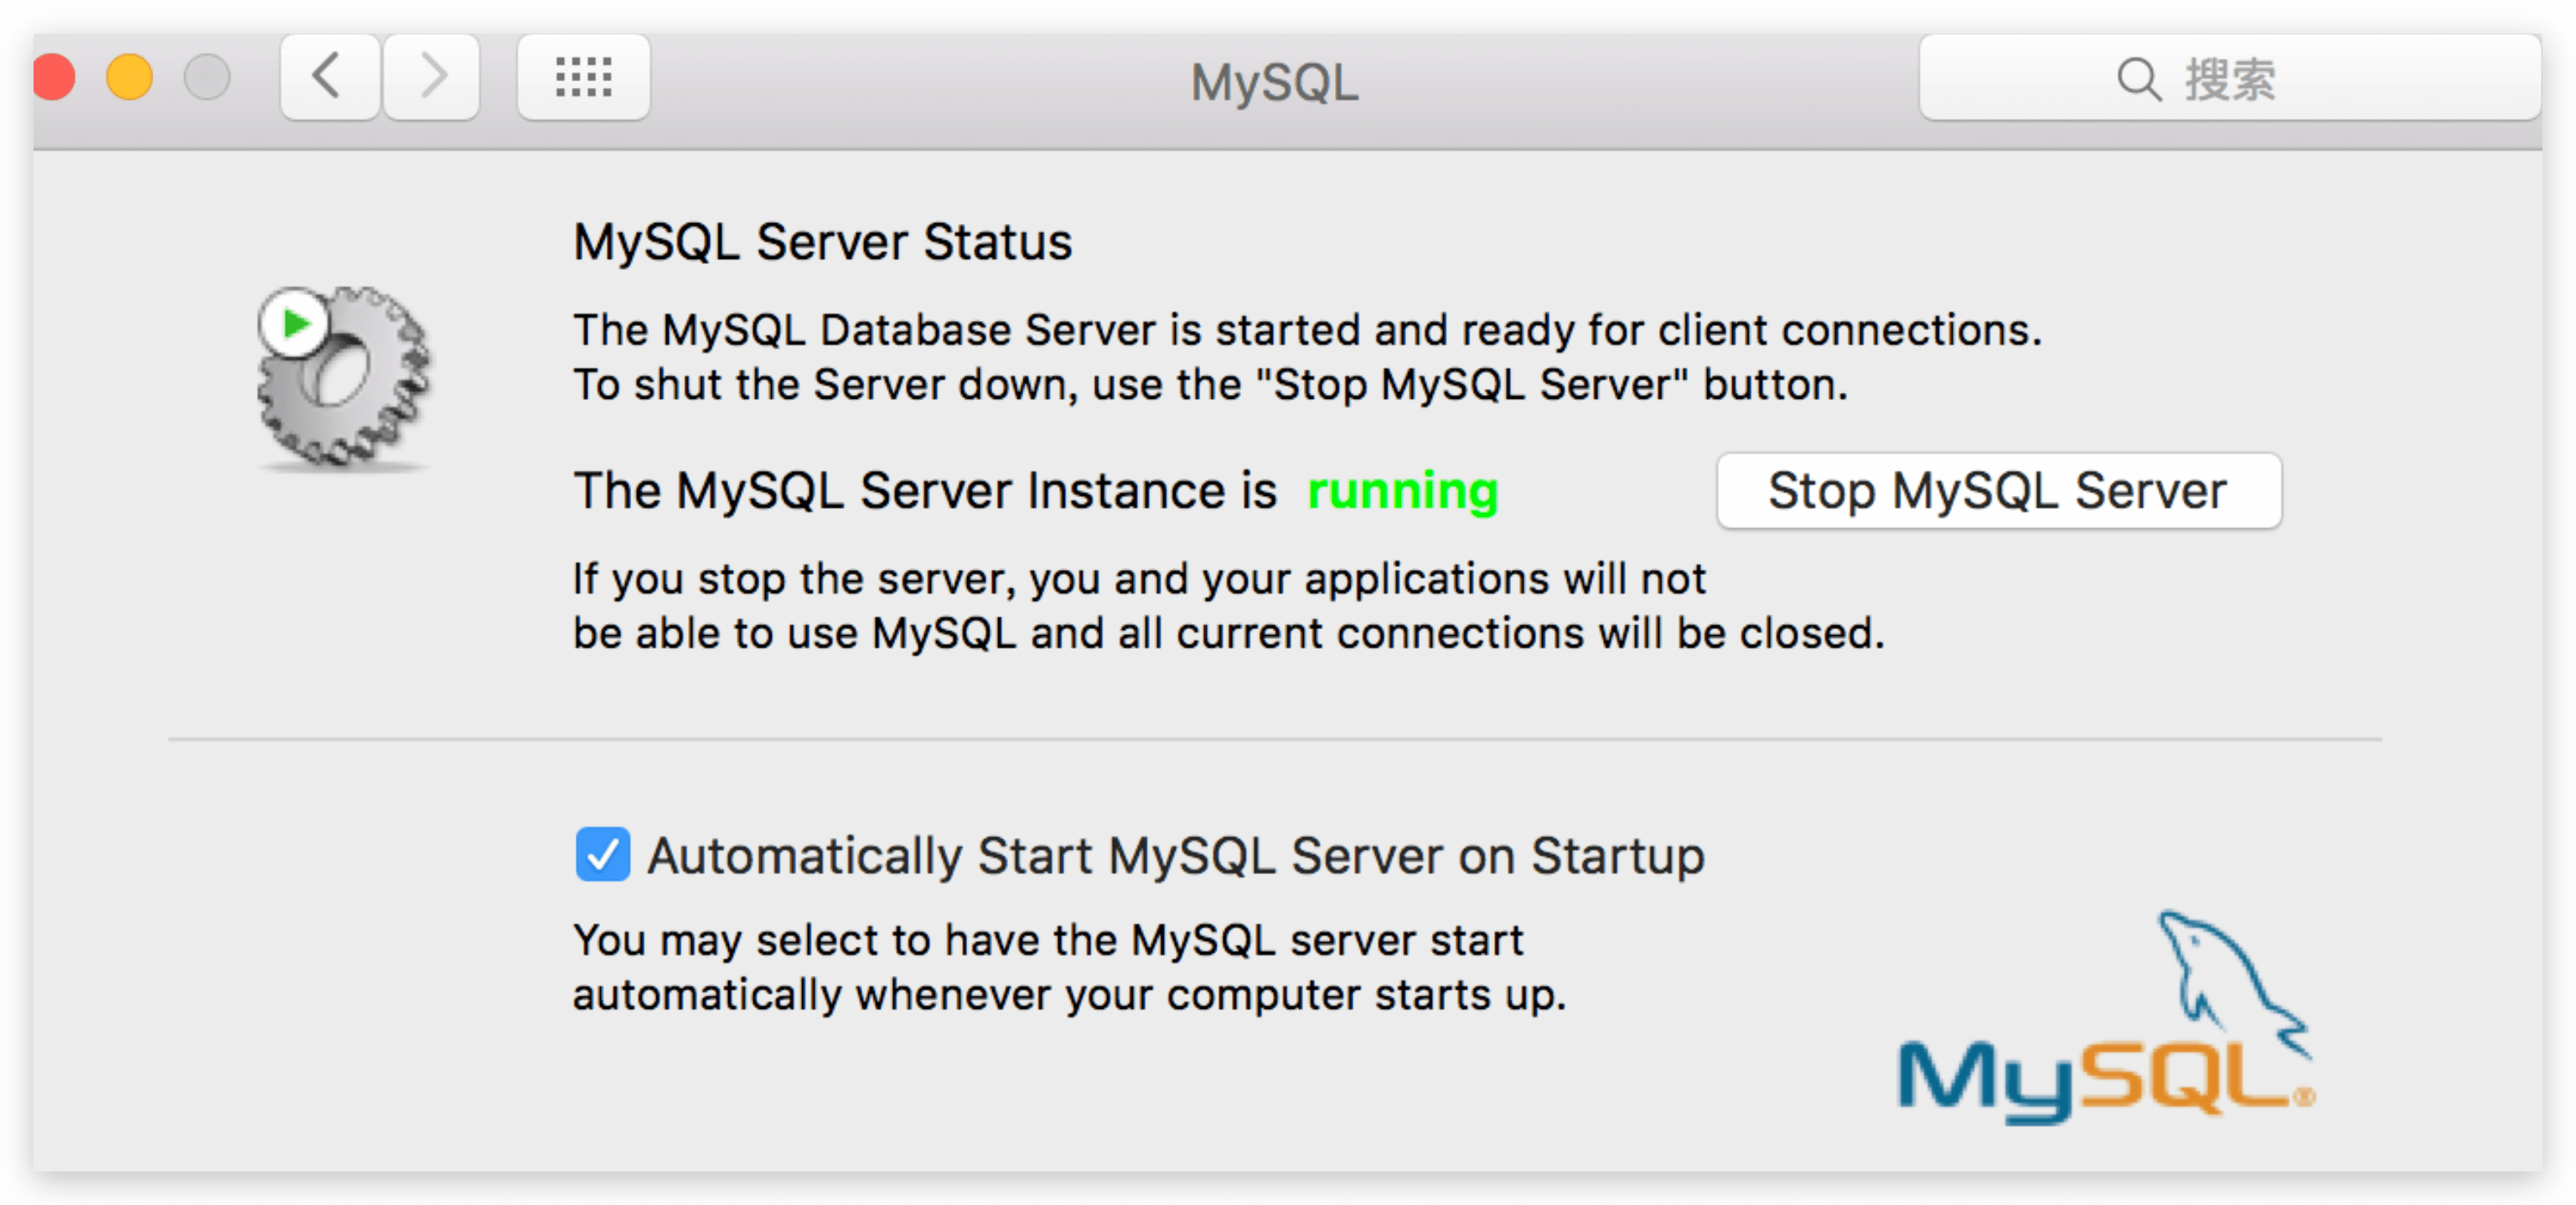
在终端查看
MySQL版本1
2
3
4
5// cmd
mysql --version
// message
mysql Ver 14.14 Distrib 5.7.21, for osx10.12 (x86_64) using EditLine wrapper
MySQL配置 & 登录
系统环境变量配置
- 进入
cd /usr/local/mysql/bin目录 执行ls -l,查看是否存在mysql文件。 - 使用
vim编辑bash_profile文件,命令:vim ~/.bash_profile。 在该文件中添加
mysql/bin的目录,按i进入编辑模式,加入如下内容:1
export PATH=${PATH}:/usr/local/mysql/bin
添加完成后,按
esc退出编辑模式,然后输入:wq保存并退出vim执行这个文件,使新添加的环境变量有效,命令如下:
1
source ~/.bash_profile
登录MySQL
- 参考上面步骤,进入系统偏好设置,开启
MySQL服务 - 终端执行
mysql -uroot -p指令,会提示输入密码,密码就是安装是保存的密码,输入即可。 - 一切顺利就可以登录成功了。
通过Homebrew安装
- 使用
homebrew安装就更简单了,懒人必备,安装homebrew参考这里。 安装mysql
1
brew install mysql
安装完成查看版本
1
2
3
4
5
// cmd
mysql --version
// message
mysql Ver 14.14 Distrib 5.7.21, for osx10.12 (x86_64) using EditLine wrapper开启mysql服务
1
mysql.server start
安装完root用户默认没有密码,需要配置root用户密码提高安全性。
- 设置root用户密码
- 删除匿名账号
- 取消root用户远程登录
- 删除test库和对test库的访问权限
刷新授权表使修改生效
1
2
// 安装安全配置向导
mysql_secure_installation1
2
3
4
5
6
7
8
9
10
11
12
13
14
15
16
17
18
19
20
21
22
23
24
25
26
27
28
29
30
31
32
33
34
35
36
37
38
39
40
41
42
43
44
45
46
47
48
49
50
51
52
53
54
55
56
57
58
59
60
61
62
63
64Securing the MySQL server deployment.
Connecting to MySQL using a blank password.
VALIDATE PASSWORD PLUGIN can be used to test passwords
and improve security. It checks the strength of password
and allows the users to set only those passwords which are
secure enough. Would you like to setup VALIDATE PASSWORD plugin?
Press y|Y for Yes, any other key for No: y
There are three levels of password validation policy: // 密码安全策略
LOW Length >= 8
MEDIUM Length >= 8, numeric, mixed case, and special characters
STRONG Length >= 8, numeric, mixed case, special characters and dictionary file
Please enter 0 = LOW, 1 = MEDIUM and 2 = STRONG: 0
Please set the password for root here.
New password: // Root用户密码
Re-enter new password: // 确认Root用户密码
Estimated strength of the password: 50
Do you wish to continue with the password provided?(Press y|Y for Yes, any other key for No) : y
By default, a MySQL installation has an anonymous user,
allowing anyone to log into MySQL without having to have
a user account created for them. This is intended only for
testing, and to make the installation go a bit smoother.
You should remove them before moving into a production
environment.
Remove anonymous users? (Press y|Y for Yes, any other key for No) : y
Success.
Normally, root should only be allowed to connect from
'localhost'. This ensures that someone cannot guess at
the root password from the network.
Disallow root login remotely? (Press y|Y for Yes, any other key for No) : y
Success.
By default, MySQL comes with a database named 'test' that
anyone can access. This is also intended only for testing,
and should be removed before moving into a production
environment.
Remove test database and access to it? (Press y|Y for Yes, any other key for No) : y
- Dropping test database...
Success.
- Removing privileges on test database...
Success.
Reloading the privilege tables will ensure that all changes
made so far will take effect immediately.
Reload privilege tables now? (Press y|Y for Yes, any other key for No) : y
Success.
All done!
登录mysql
1
mysql -uroot
修改MySQL密码
- 安装生成的密码是随机生成的字符串,我连自己设置的密码都记不住了,还TM记这个密码🌚。
如果记得初始密码
如果还没有忘记初始密码,那么恭喜你,修改很简单。
- 执行
mysql -uroot -p指令,输入默认密码登录MySQL。 newPassword为新密码,直接修改即可。1
SET PASSWORD FOR 'root'@'localhost' = PASSWORD('newPassword');
- 执行
如果忘记初始密码
修改密码步骤如下:
关闭mysql服务,可以在系统偏好设置关闭,也可以在终端执行如下命令:
1
sudo /usr/local/mysql/support-files/mysql.server start
进入mysql目录
1
cd /usr/local/mysql/bin/
获取管理员权限
1
sudo su
禁止mysql验证功能,mysql会自动重启,偏好设置中的mysql状态会变成running
1
./mysqld_safe --skip-grant-tables &
新开一个终端窗口,进入mysql目录1
cd /usr/local/mysql/bin/
输入如下两个指令执行并刷新
1
2
./mysql
flush privileges; // 分号不要忘了修改新密码
1
set password for 'root'@'localhost' = password('newPassword');