凄凉宝剑篇,羁泊欲穷年。
黄叶仍风雨,青楼自管弦。
新知遭薄俗,旧好隔良缘。
心断新丰酒,销愁斗几千。
响应者对象
- 在iOS中不是任何对象都能处理事件,只有继承了
UIResponder的对象才能接收并处理事件。我们称之为“响应者对象” UIApplication、UIViewController、UIView都继承自UIResponder,因此它们都是响应者对象,都能够接收并处理事件- UIResponder内部提供了以下方法来处理事件
1 | // 触摸事件 |
- UIView是UIResponder的子类,可以覆盖下列4个方法处理不同的触摸事件
1 | // 一根或者多根手指开始触摸view,系统会自动调用view的下面方法 |
UITouch
- 当用户用一根触摸屏幕时,会创建一个与手指相关联的UITouch对象: 一根手指对应一个UITouch对象
- UITouch的作用:
- 保存着跟手指相关的信息,比如触摸的位置、时间、阶段
- 当手指移动时,系统会更新同一个UITouch对象,使之能够一直保存该手指在的触摸位置
- 当手指离开屏幕时,系统会销毁相应的UITouch对象
- 提示:iPhone开发中,要避免使用双击事件!
UITouch的属性
1 | // 触摸产生时所处的窗口 |
UITouch的方法
1 | - (CGPoint)locationInView:(UIView *)view; |
UIEvent
- 每产生一个事件,就会产生一个
UIEvent对象 UIEvent:称为事件对象,记录事件产生的时刻和类型
1 | // 常见属性 |
touches和event参数
- 一次完整的触摸过程,会经历3个状态:
1 | 触摸开始:- (void)touchesBegan:(NSSet *)touches withEvent:(UIEvent *)event |
- 4个触摸事件处理方法中,都有
NSSet *touches和UIEvent *event两个参数
一次完整的触摸过程中,只会产生一个事件对象,4个触摸方法都是同一个event参数 - 如果两根手指同时触摸一个view,那么view只会调用一次
touchesBegan:withEvent:方法,touches参数中装着2个UITouch对象 - 如果这两根手指一前一后分开触摸同一个view,那么view会分别调用2次
touchesBegan:withEvent:方法,并且每次调用时的touches参数中只包含一个UITouch对象 - 根据touches中UITouch的个数可以判断出是单点触摸还是多点触摸
触摸事件的产生和传递
- 发生触摸事件后,系统会将该事件加入到一个由UIApplication管理的事件队列中
- UIApplication会从事件队列中取出最前面的事件,并将事件分发下去以便处理,通常,先发送事件给应用程序的主窗口(keyWindow)
- 主窗口会在视图层次结构中找到一个最合适的视图来处理触摸事件,这也是整个事件处理过程的第一步
- 找到合适的视图控件后,就会调用视图控件的touches方法来作具体的事件处理
事件的产生和传递
- 触摸事件的传递是从父控件传递到子控件
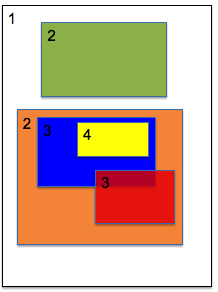
1 | 点击了绿色的view: |
注意
- 如果父控件不能接收触摸事件,那么子控件就不可能接收到触摸事件
如何找到最合适的控件来处理事件?(步骤如下)
- 自己是否能接收触摸事件?
- 触摸点是否在自己身上?
- 从后往前遍历子控件,重复前面的两个步骤
- 如果没有符合条件的子控件,那么就自己最适合处理
注意: 从后往前遍历子控件–”后”是表示数组里最外面的,即是显示在最前面的控件.(比如subviews[0]即是最前面的–是UIWindow)
UIView不接收触摸事件的三种情况
- 提示:UIImageView的userInteractionEnabled默认就是NO,因此UIImageView以及它的子控件默认是不能接收触摸事件的
1 | // 不接收用户交互 |
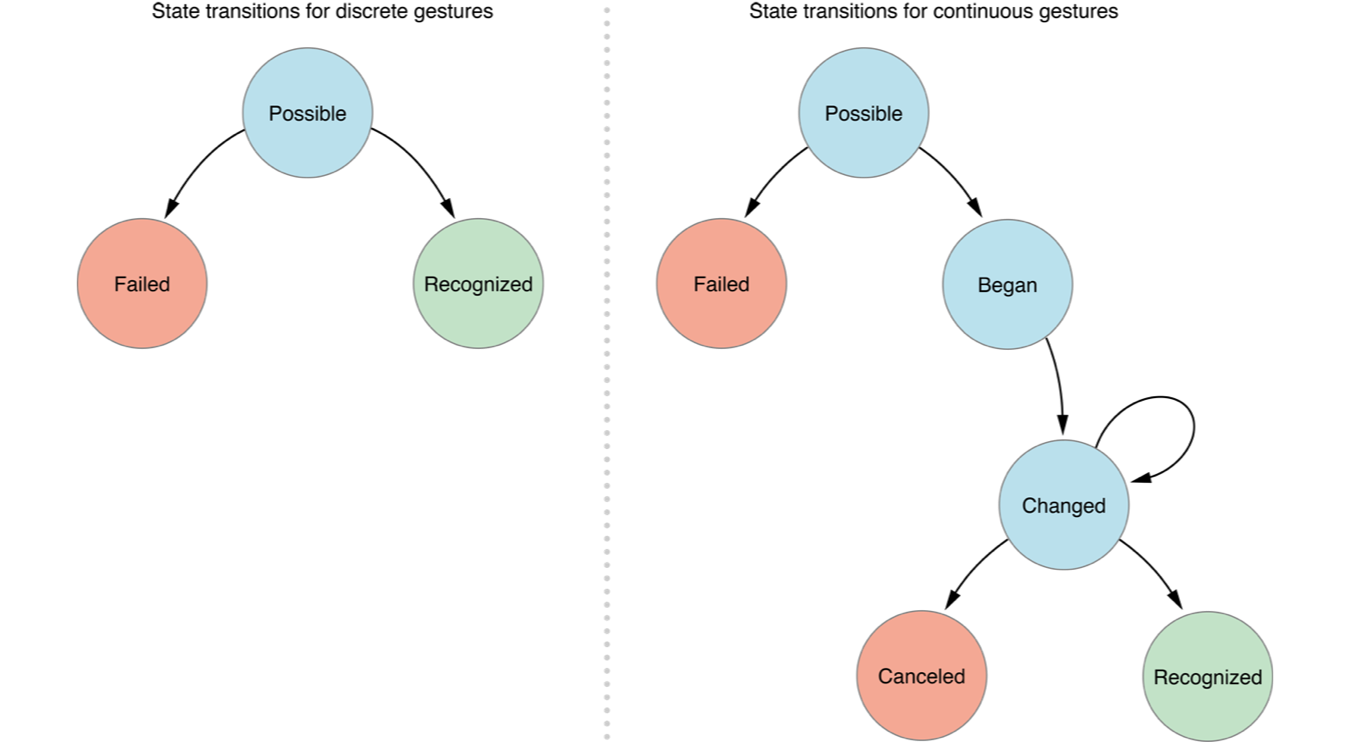
响应者链条
事件的处理过程(详细)
- 用户点击屏幕后产生的一个触摸事件,经过一些列的传递过程后,会找到最合适的视图控件来处理这个事件
- 找到最合适的视图控件后,就会调用控件的touches方法来作具体的事件处理
- 这些touches方法的默认做法是将事件顺着响应者链条向上传递,将事件交给上一个响应者进行处理
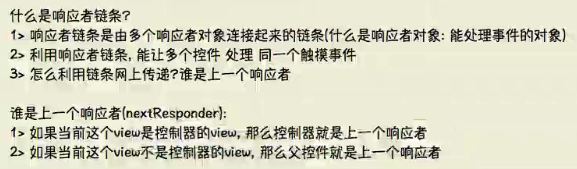
响应者链条示意图>
响应者链的事件传递过程
- 如果view的控制器存在,就传递给控制器;如果控制器不存在,则将其传递给它的父视图
- 在视图层次结构的最顶级视图,如果也不能处理收到的事件或消息,则其将事件或消息传递给window对象进行处理
- 如果window对象也不处理,则其将事件或消息传递给UIApplication对象
- 如果UIApplication也不能处理该事件或消息,则将其丢弃
手势识别
- 添加手势的方式
- 代码创建,添加监听(方法)
- storyboard的里面拖手势,添加监听(拖线(手势方法))
监听触摸事件
- 如果想监听一个view上面的触摸事件,之前的做法是
自定义一个view - 实现view的touches方法,在方法内部实现具体处理代码
缺点
- 通过touches方法监听view触摸事件,有很明显的几个缺点
- 必须得自定义view
- 由于是在view内部的touches方法中监听触摸事件,因此默认情况下,无法让其他外界对象监听view的触摸事件,不容易区分用户的具体手势行为
- iOS 3.2之后,苹果推出了手势识别功能(Gesture Recognizer),在触摸事件处理方面,大大简化了开发者的开发难度
UIGestureRecognizer
- 为了完成手势识别,必须借助于手势识别器–
UIGestureRecognizer - 利用
UIGestureRecognizer,能轻松识别用户在某个view上面做的一些常见手势 UIGestureRecognizer是一个抽象类,定义了所有手势的基本行为,使用它的子类才能处理具体的手势
1 | UITapGestureRecognizer(敲击) |
UITapGestureRecognizer
- 每一个手势识别器的用法都差不多,比如
UITapGestureRecognizer的使用步骤如下
1 | /** 手指敲击手势 |
UILongPressGestureRecognizer
1 | - (void)demo |
UISwipeGestureRecognizer
1 | // 默认图片是不能交互的 |
UIRotationGestureRecognizer
1 | - (void)rotationGesture |
UIPinchGestureRecognizer
1 | - (void)pinchGesture |
UIPanGestureRecognizer
1 | // 创建拖拽手势 |
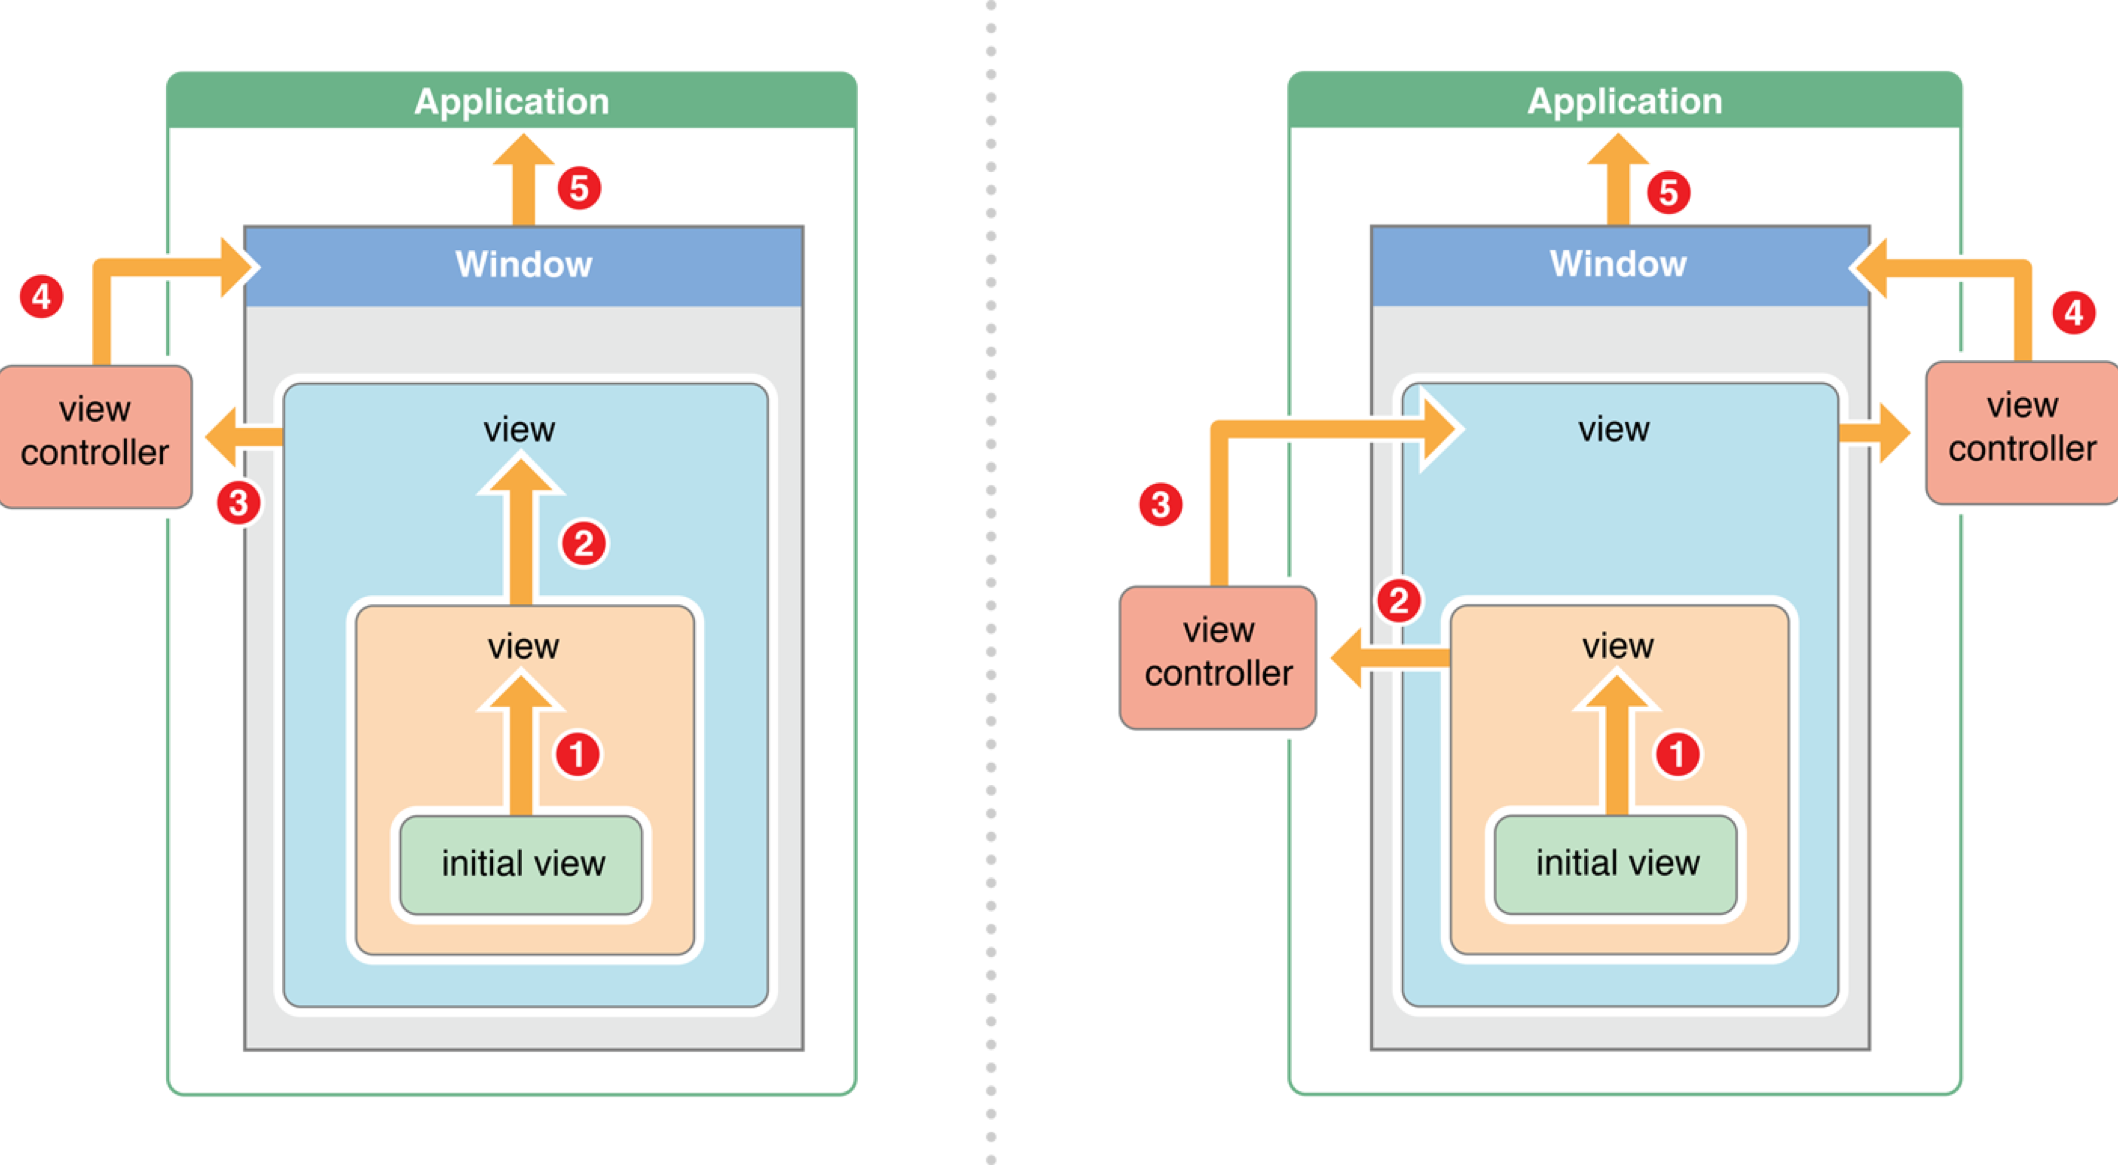
手势识别的状态
1 | typedef NS_ENUM(NSInteger, UIGestureRecognizerState) { |
手势的注意点
- 手势默认不能一次添加多个手势,一次添加多个手势只能识别一个(最后添加那个手势),但是可以创建多个手势,这样才能识别多个手势.
- Simultaneously (同时地,同步地)
1 | /** |