当我跨过沉沦的一切,向着永恒开战的时候,你是我的军旗。
—— 王小波《爱你就像爱生命》
关于蓝牙4.0
- 蓝牙4.0是由蓝牙技术联盟在2012年发布的最新蓝牙版本,较3.0版本更省电、成本低、延迟低、超长有效连接距离、AES-128加密等。蓝牙4.0设备因为低耗电,所以也叫做BLE (Bluetooth Low Energy)。
- 支持两种部署方式:双模式和单模式。
- 双模式包含传统蓝牙部分(Classsic Bluetooth)和低功耗蓝牙部分(Bluetooth Low Energy 即BLE)。
在BLE4.0之前,连接的蓝牙设备是需要经过MFI认证的
- MFI – Make For ipad ,iphone, itouch 等专们为苹果设备制作的设备
Apple设备对BLE4.0支持
- iPhone4S及以后的设备
- 第三代iPad及以后的设备
- iMac、MacBookAir、MacBook Pro等
- 系统是从iOS6开始支持BLE4.0
CoreBluetooth框架
- CoreBluetooth是Apple基于蓝牙4.0标准封装的一套蓝牙开发框架,也就是说使用CoreBluetooth开发的时候,对应的蓝牙设备必须也遵循蓝牙4.0。
- CoreBluetooth开发分两种模式
- 中心模式(Central): 接收周边蓝牙发来的广播数据。
- 外设模式(Peripheral): 自己作为蓝牙设备,对外广播数据。
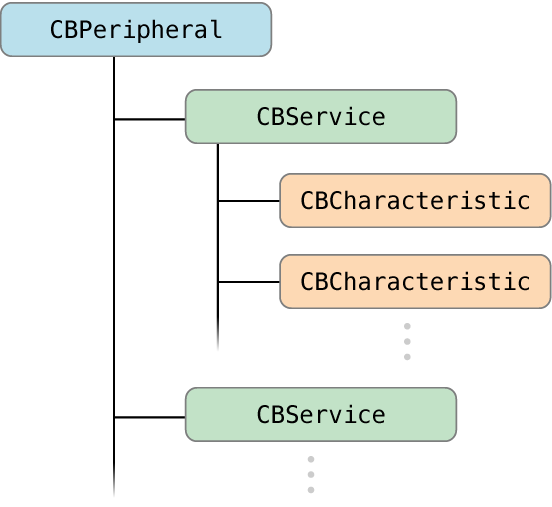
- 一个外部设备包含一个或多个服务,一个服务包含一个或多个特征。
中心模式的开发流程
- 建立中心管理者
- 扫描外设
- 连接外设
- 扫描外设中的服务和特征
- 获取外设的services
- 获取外设的Characteristics,获取Characteristics的值,获取Characteristics的Descriptor和Descriptor的值
- 订阅Characteristic
- 与外设做数据交互(explore and interact)
- 断开连接(disconnect)
初始化
- 使用蓝牙需要在inof.plist文件配置
Privacy - Bluetooth Peripheral Usage DescriptionKEY向用户请求蓝牙权限 - 导入蓝牙开发框架遵守两个协议
- 初始化一个中心设备管理者并设置代理
1 |
|
监听蓝牙状态改变
- 初始化蓝牙中心设备管理者之后,会检测并返回当前系统蓝牙状态
- 当蓝牙处于打开可用状态,我们就可以使用蓝牙发起扫描周边的外设了
1 | - (void)centralManagerDidUpdateState:(CBCentralManager *)central; |
扫描外设
- 扫描设别可以扫描周边所有的设备也可以根据服务UUID过滤掉不符合的设备,可根据需求选择
- 只在必要的时候设置 CBCentralManagerScanOptionAllowDuplicatesKey
- peripheral 每秒都在发送大量的数据包,scanForPeripheralsWithServices:options:方法会将同一 peripheral 发出的多个数据包合并为一个事件,然后每找到一个 peripheral 都会调用 centralManager:didDiscoverPeripheral:advertisementData:RSSI:方法。另外,当已发现的 peripheral 发送的数据包有变化时,这个代理方法同样会调用。
- 以上合并事件的操作是 scanForPeripheralsWithServices:options:的默认行为,即未设置 option参数。如果不想要默认行为,可将 option设置为 CBCentralManagerScanOptionAllowDuplicatesKey。设置以后,每收到广播,就会调用上面的回调(无论广播数据是否一样)。关闭默认行为一般用于以下场景:根据 peripheral 的距离来初始化连接(距离可用信号强度 RSSI 来判断)。设置这个 option会对电池寿命和 app 的性能产生不利影响,所以一定要在必要的时候,再对其进行设置。
1 | // 方式1 :扫描所有设备 |
- 扫描成功后就会调用如下方法将外设的名称、标识、信号强度、状态等信息返回
- 可以在此方法筛选和过滤扫描到的设备,如根据公司外设的命名规定和搜索到的设备名称对比,过滤掉一些不符合的设备
- 注意点:
- 如果需要获取蓝牙的名称,推荐从advertisementData中获取,而不要直接获取aPeripheral中的,因为有时候蓝牙设备修改名称 peripheral.name 不会立即刷新,而advertisementData会实时刷新
- iOS框架是不能通过Mac地址直接连接蓝牙的而且Apple公司也屏蔽了设备的Mac地址,取代返回的是一个根据某些参数生成的UUID,这一点和安卓不同,并且iOS蓝牙连接外设获取的的唯一标识并不是绝对唯一的: 重启手机就可能导致设备的唯一标识发生变化,而且不同手机连接同一个设备获取到的蓝牙设备标识也是不同的
- 如果对连接的设备的唯一标识有特别的需求,可以通过和硬件工程师沟通将Mac地址放入advertisementData中来实现获取设备的Mac地址
1 | - (void)centralManager:(CBCentralManager *)central didDiscoverPeripheral:(CBPeripheral *)aPeripheral advertisementData:(NSDictionary *)advertisementData RSSI:(NSNumber *)RSSI |
连接外设
- 扫描到外设,就可以发起连接了
- 注意:连接外设前,需要关闭扫描以省电并减少位置错误发生
1 | [_centralManager stopScan];// 停止扫描 |
- 连接外设成功调用方法,在此方法可以开始扫描服务信息
- 注意:一定要设置代理,不然扫描到服务信息也不会有代理回调
1 | - (void)centralManager:(CBCentralManager *)central didConnectPeripheral:(CBPeripheral *)peripheral |
- 连接外设失败调用方法,此时需要清空代理
1 | - (void)centralManager:(CBCentralManager *)central didFailToConnectPeripheral:(CBPeripheral *)peripheral error:(NSError *)error |
扫描到外设
- 扫描到外设服务时如果传入
nil, 则代表扫描所有的外设服务 - 但实际上,你可能只需要其中的某几个。搜索全部的操作既耗时又耗电,所以应该提供一个要搜索的 service 的 UUID 数组
1 | [peripheral discoverServices:nil]; |
- 扫描到外设服务的回调
- 扫描扫服务信息后,既可以去扫描服务里面的特征
1 | - (void)peripheral:(CBPeripheral *)peripheral didDiscoverServices:(NSError *)error |
扫描特征
- 获取到对应的需要的特征,我们既可以对特征进行订阅或者和设别进行数据交互以及升级设备蓝牙信息等等操作
- 接收 characteristic 数据的方式有两种:
- 在需要接收数据的时候,调用 readValueForCharacteristic:,这种是需要主动去接收的。
- 用 setNotifyValue:forCharacteristic:方法订阅,当有数据发送时,可以直接在回调中接收。
1 | - (void)peripheral:(CBPeripheral *)peripheral didDiscoverCharacteristicsForService:(CBService *)service error:(NSError *)error |
- 特征值类型
1 | typedef NS_OPTIONS(NSUInteger, CBCharacteristicProperties) { |
读取特征的数据
- characteristic 包含了 service 要传输的数据。例如温度设备中表达温度的 characteristic,就可能包含着当前温度值。这时我们就可以通过读取 characteristic,来得到里面的数据。
- 当找到 characteristic 之后,可以通过调用CBPeripheral的readValueForCharacteristic:方法来进行读取。
- 当你调用上面这方法后,会回调peripheral:didUpdateValueForCharacteristic:error:方法,其中包含了要读取的数据。如果读取正确,可以用以下方式来获得值:
1 | - (void)peripheral:(CBPeripheral *)peripheral didUpdateValueForCharacteristic:(CBCharacteristic *)characteristic error:(NSError *)error { |
- 注意,不是所有 characteristic 的值都是可读的,你可以通过CBCharacteristicPropertyReadoptions 来进行判断(这个枚举会在下一章中介绍到)。如果你尝试读取不可读的数据,那上面的代理方法会返回相应的 error。
订阅 Characteristic 数据
- 其实使用readValueForCharacteristic:方法并不是实时的。考虑到很多实时的数据,比如心率这种,那就需要订阅 characteristic 了。
- 可以通过调用CBPeripheral的setNotifyValue:forCharacteristic:方法来实现订阅,注意第一个参数是YES。
1 | [peripheral setNotifyValue:YES forCharacteristic:interestingCharacteristic]; |
- 如果是订阅,成功与否的回调是peripheral:didUpdateNotificationStateForCharacteristic:error:,读取中的错误会以 error 形式传回:
- 当然也不是所有 characteristic 都允许订阅,依然可以通过CBCharacteristicPropertyNoifyoptions 来进行判断
1 | - (void)peripheral:(CBPeripheral *)peripheral didUpdateNotificationStateForCharacteristic:(CBCharacteristic *)characteristic error:(NSError *)error { |
数据写入特征
- 写数据其实是一个很常见的需求,如果 characteristic 可写,你可以通过CBPeripheral类的writeValue:forCharacteristic:type:方法来向设备写入NSData数据。
CBCharacteristicWriteWithResponse指定写入成功后回调代理方法CBCharacteristicWriteWithoutResponse指定写入成功后不需要回调代理方法
1 | [_connectedPeripheral writeValue:data forCharacteristic:toCharacteristic type:CBCharacteristicWriteWithResponse]; |
- 如果写入成功后要回调,那么回调方法是peripheral:didWriteValueForCharacteristic:error:。如果写入失败,那么会包含到 error 参数返回。
- 注意:characteristic 也可能并不支持写操作,可以通过CBCharacteristic的properties属性来判断。
1 | - (void)peripheral:(CBPeripheral *)peripheral didWriteValueForCharacteristic:(CBCharacteristic *)characteristic error:(NSError *)error; |
关于数据分包及数据校验的一些扩展
- 蓝牙4.0因为是低功耗的,所以数据发送的效率就没有之前版本蓝牙的收发效率高,每次接收和发送数据不能超过20个字节
1、写入数据:如果想最大程度的的发挥蓝牙的效率,就需要对发送的数据进行分包处理并且尽可能保证除去协议所占的字节后每包携带的有效数据长度比较大
- 假设我们发送的每一包数据协议格式为:
header(1Byte) + Length(1Byte) + cmd(1Byte) + paramData(<= 16Byte) + check(1Byte) - 如果需要发送的数据小于16个字节,直接按协议组装数据发送
如果需要发送的数据大于16个字节,需要按16个字节分包后按协议组装数据发送
1
2
3
4
5
6
7
8
9
10
11
12
13
14
15
16
17
18
19
20
21
22
23
24
25
26
27
28
29
30
31
32
33
34
35
36
37
38
39
40
41/**
写入不分包数据
@param data 数据
@param toCharacteristic 要写入的特征值
*/
- (void)writeSinglePacketData:(NSData *)data toCharacteristic:(CBCharacteristic *)toCharacteristic {
if (!toCharacteristic || !_bleClient.isBleConnected || kObjectIsEmpty(data)) { return; }
self.isContinueWriting = NO; // 是否需要继续写入数据
[_bleClient.connectedPeripheral writeValue:data forCharacteristic:toCharacteristic type:CBCharacteristicWriteWithResponse];
}
/**
写入需要分包数据
@param data 需要分包发送数据
@param toCharacteristic 要写入的特征值
*/
- (void)writeMultiplePacketData:(NSData *)data toCharacteristic:(CBCharacteristic *)toCharacteristic {
if (!toCharacteristic || !_bleClient.isBleConnected || kObjectIsEmpty(data)) { return; }
self.isContinueWriting = YES; // 是否需要继续写入数据
self.subdataOffset = 0; // 已经截取的数据长度
self.needSubData = data; // 需要分包的数据
[self writeSubDataToCharacteristic:toCharacteristic];
}
/** 将截取的数据发送出去 */
- (void)writeSubDataToCharacteristic:(CBCharacteristic *)characteristic {
NSInteger totalLength = self.needSubData.length;
NSInteger remainLength = totalLength - self.subdataOffset;
NSInteger rangLength = remainLength > XSCentralmanagerOTADataSubLength ? XSCentralmanagerOTADataSubLength:remainLength;
NSData *data = [self.needSubData subdataWithRange:NSMakeRange(self.subdataOffset, rangLength)];
self.subdataOffset += data.length;
if (kObjectIsEmpty(data)) { // 通知代理写入错误
XSLog(@"没有数据可以写入了。。。✍️✍️✍️");
return;
}
// 继续写入数据
[_bleClient.connectedPeripheral writeValue:data forCharacteristic:characteristic type:CBCharacteristicWriteWithResponse];
}self.isContinueWriting标记在每包数据写入成功的回调- (void)blePeripheral:(CBPeripheral *)peripheral didWriteValueForCharacteristic:(CBCharacteristic *)characteristic error:(NSError *)error里面是否继续写入下一包数据
- 假设我们发送的每一包数据协议格式为:
2、接收数据:如果接受的数据过大,也会是分包接收到。
- 所以就需要在接收蓝牙数据的地方,校验接收到的每一包数据长度以确保数据接收完整
- 可以创建一个数据接收蓝牙数据校验的工具单例
- 将数据协议定义为一个枚举
提供一个方法传入蓝牙接收到的数据以及一个数据接收完整的回调结果block
- 每次的数据都按协议进行校验并缓存中间的有效数据
- 如果已经接收到的有效数据和数据总长度(协议中的发送长度字节)不相同就继续等待接收
- 如果已经接收到的有效数据和数据总长度(协议中的发送长度字节)相同就代表数据接收完整、回调block
1
2
3
4
5
6
7
8
9
10
11
12
13
14
15
16
17
18
19
20
21
22
23
24
25
26
27
28
29
30
31
32
33
34
35// 在接收到蓝牙数据的方法校验数据
- (void)blePeripheral:(CBPeripheral *)peripheral didUpdateValueForCharacteristic:(CBCharacteristic *)characteristic error:(NSError *)error {
XSLogFunc
if (error) {
XSLog(@"读取Characteristic数据失败:%@", error);
return;
}
NSData *value = characteristic.value;
XSLog(@"读取到特征的数据:%@", value);
// 接收到的数据完整性校验
[[XSVerifyBleDataTool shareInstance] handleReceivedDataWithData:value complete:^{
NSInteger responseType = XSBleVerifyUtility.responseCmd;
if (_dispatchCmdComplete) {
_dispatchCmdComplete(responseType);
} }];
}
// 数据校验工具单例XSVerifyBleDataTool提供给外界校验方法
typedef NS_ENUM(NSUInteger, XSReceivedDataState) {
XSReceivedDataStateHeader, /**< header */
XSReceivedDataStateLength,/**< 数据总长度 */
XSReceivedDataStateData,/**< 数据 */
XSReceivedDataStateCheckSum,/**< 校验和 */
};
/**
处理蓝牙接收到的数据
@param receivedData 接收到的数据
@param complete 处理回调
*/
- (void)handleReceivedDataWithData:(NSData *)receivedData complete:(void (^)(void))complete;
3、关于指令调用
- 以为可能其他地方也会用到蓝牙,所以推荐把整个蓝牙连接及验证封装成一个蓝牙工具类
- 因为App和外设交互的指令也会比较多,可能会分散在项目的不同地方,而蓝牙数据的写入和接收都是在代理方法中回调,我的做法是把调用蓝牙指令写入数据的逻辑抽成公共的方法:传需要写入的数据,写入成功的回调Block(可以调用的指令,状态回调回去)
1
2
3
4
5
6
7
8
9
10
11
12
13
14
15
16
17
18
19
20
21
22
23
24
25
26
27
28
29
30
31
32
33
34
35
36
37
38
39
40
41
42
43
44
45
46
47
48
49
50
51/**
派发蓝牙指令
@param command 蓝牙指令
@param paramData 是否需要发送参数
@param complete 指令响应后回调的block
*/
- (void)dispatchCommand:(XSBleRequestState)command paramData:(NSData *)paramData completion:(void (^)(NSInteger resultCommand))complete {
_dispatchCmdComplete = complete;
[self handleUniversalBleRequestWithProtocolHeader:XSProtocolHeaderBle bleCmd:command paramData:paramData];
}
/**
派发蓝牙指令
@param protocolHeader 指令头 (区分不同的蓝牙协议)
@param command 蓝牙指令
@param paramData 是否需要发送参数
@param complete 指令响应后回调的block
*/
- (void)dispatchWithProtocolHeader:(XSProtocolHeader)protocolHeader command:(XSBleRequestState)command paramData:(NSData *)paramData completion:(void (^)(NSInteger resultCommand))complete {
_dispatchCmdComplete = complete;
[self handleUniversalBleRequestWithProtocolHeader:protocolHeader bleCmd:command paramData:paramData];
}
/**
发送蓝牙指令的通用处理方法(处理完数据后直接写入蓝牙)
@param bleCmd 发送的蓝牙指令
@param paramData 发送的数据
*/
- (void)handleUniversalBleRequestWithProtocolHeader:(XSProtocolHeader)protocolHeader bleCmd:(XSBleRequestState)bleCmd paramData:(NSData *)paramData {
NSData *resultData = [NSData data];
if (kObjectIsEmpty(paramData)) {
resultData = [XSDataProtocol handleDataWithProtocolHeader:protocolHeader command:bleCmd];
} else {
resultData = [XSDataProtocol handleDataWithProtocolHeader:protocolHeader command:bleCmd paramData:paramData]; // 按照约定的协议组装数据
}
if (resultData.length) {
XSLog(@"最终发送的指令数据:%@", resultData);
if (resultData.length > 20) {
[self writeMultiplePacketData:resultData toCharacteristic:_bleClient.writeCharacteristic];
} else {
[self writeSinglePacketData:resultData toCharacteristic:_bleClient.writeCharacteristic];
}
}
}
所以大概的写入逻辑就可以简化为
1
2
3
4[_bleMgr dispatchCommand:XSBleRequestStatusBattery_Level paramData:nil completion:^(NSInteger resultCommand) { // 获取电池电量
// ......
}
}];
关于后台模式
- 按照Apple的一贯尿性,打着保护隐私的名义限制各种Api和权限,如果想蓝牙在后台运行也是需要申请权限并配置的
- App没有申请后台权限则在进入后台模式之后很快就会被挂起(按下home键,大约5秒,app进入suspended状态)。
- 当app处于挂起状态时,无法处理任何蓝牙相关的任务直到app进入前台(被用户唤醒)。
- 处于后台模式(backgroud state)或者悬挂模式(suspended state)时,作为中心设备,无法搜索和发现周边在广告的设备。作为外设时,无法广告,此时中心想要通过公开服务的特征去访问它的话都会报错。
- 具体的后台模式设置及恢复请参考
- iOS BLE 开发小记 - 如何实现 CoreBluetooth 后台运行模式
关于Demo
需要Demo请点击这里下载