荷叶生时春恨生,荷叶枯时秋恨成。
深知身在情长在,怅望江头江水声。
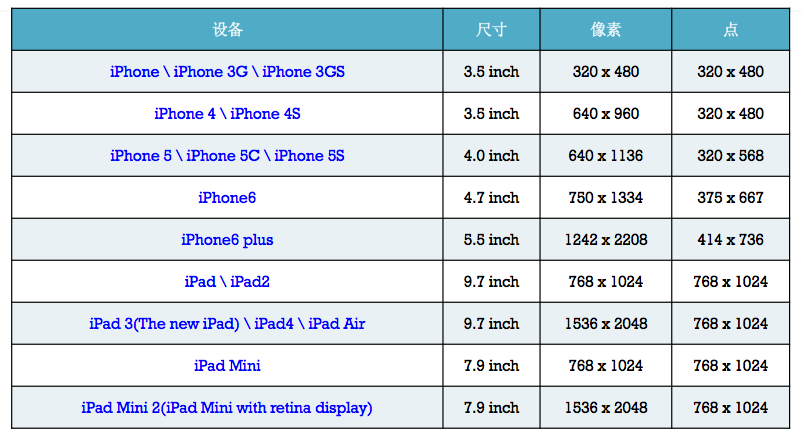
屏幕适配
屏幕类型
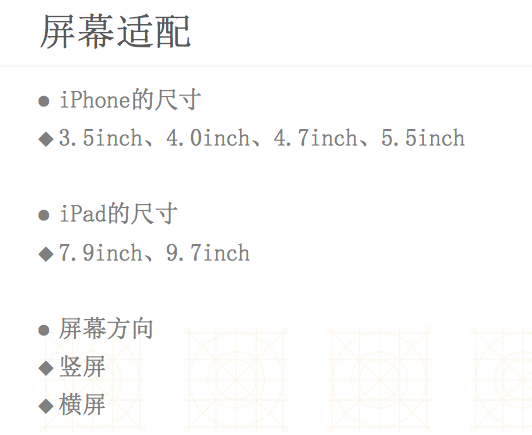
点和像素

屏幕分辨率
iPhone4之前
- 没有适配,不用适配
- 经常会出现坐标值写死的代码
1 | //#define ScreenW 320 |
iPad出现以后
- 需要横竖屏适配
- 出现了一种方便的屏幕适配技术:
Autoresizing- 局限性:仅仅能解决子控件和父控件之间的相对关系问题
iOS6开始(Xcode4开始)
- 出现了一种新的屏幕适配技术:
Autolayout- 解决任何控件之间的相对关系问题
iOS8开始(Xcode6开始)
- 出现了一种新的屏幕适配技术:
Sizeclass
Autoresizing
- UIViewAutoresizingFlexible
LeftMargin = 1 << 0,- 距离父控件
左边的间距是伸缩的
- 距离父控件
- UIViewAutoresizingFlexible
RightMargin = 1 << 2,- 距离父控件
右边的间距是伸缩的
- 距离父控件
- UIViewAutoresizingFlexible
TopMargin = 1 << 3,- 距离父控件
上边的间距是伸缩的
- 距离父控件
- UIViewAutoresizingFlexible
BottomMargin = 1 << 5- 距离父控件
下边的间距是伸缩的
- 距离父控件
- UIViewAutoresizingFlexible
Width= 1 << 1,宽度跟随父控件宽度进行伸缩
- UIViewAutoresizingFlexible
Height= 1 << 4,高度跟随父控件高度进行伸缩
Autolayout
2个核心概念
- 约束
- 尺寸约束
- width约束
- height约束
- 位置约束
- 间距约束(上下左右间距)
- 尺寸约束
- 参照
- 所添加的约束跟哪个控件有关(相对于哪个控件来说)
常见单词
Leading->Left-> 左边Trailing->Right-> 右边
实现约束动画
1 | [UIView animateWithDuration:2.0 animations:^{ |
警告和错误
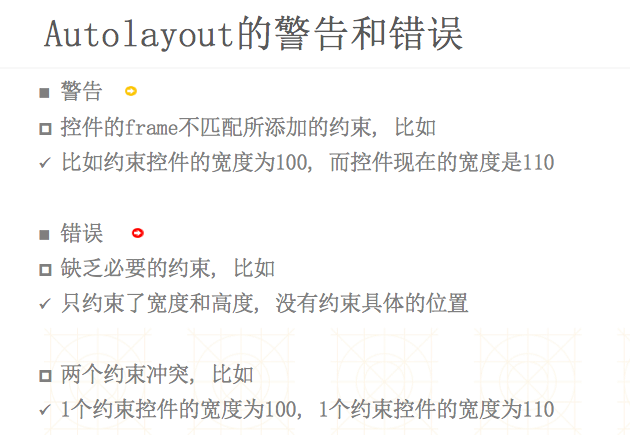
UILabel实现包裹内容
- 设置宽度约束为 <= 固定值
- 设置位置约束
- 不用去设置高度约束
开发中能用到的小技巧
- 有时候也会约束某几个控件的位置和宽高在屏幕中的位置等间距不变 此时需要在这些控件中间添加占位控件并设置hidden属性为yes即可
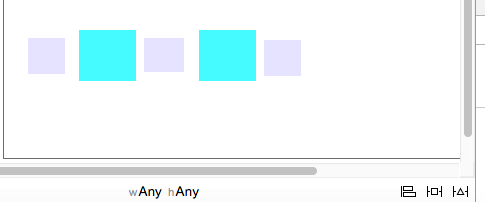
- 青色的控件设置:
- 第一个青色控件自身的宽高以及和顶部或者底部的间隙
- 第二个青色控件和第一个顶部或者底部水平 宽高尺寸也相同
- 灰色的为占位控件 设置 :
- 左右间隙均为0
- 高度随便固定一个值 (宽度不要设置)
- 距离顶部或者底部的间隙
- 其他两个控件和第一个控件的顶或者底部对齐 宽度相同(高度随意)
- 设置隐藏属性为yes
Masonry基本使用
头文件的宏定义
1 | //define this constant if you want to use Masonry without the 'mas_' prefix |
添加约束
方式1 (推荐的写法 可视化比较好)
1 | [blueView makeConstraints:^(MASConstraintMaker *make) { |
方式2(有mas_前缀)
1 | [redView makeConstraints:^(MASConstraintMaker *make) { |
不推荐的写法(可视化比较差)
1 | [redView mas_makeConstraints:^(MASConstraintMaker *make) { |
1 | [redView mas_makeConstraints:^(MASConstraintMaker *make) { |
约束的其他常见注意点
- 约束的添加
1 | // makeConstraints: 每次都会添加新的约束 |
- 约束的update
1 | // updateConstraints:专门用于更新约束的,如果没有约束会创建一个新的 如果有直接修改以前的 |
- 约束的清空
1 | // remakeConstraints: 清空约束, 删除约束 |
VFL
VisualFormatLanguage: 可视化规格语言。注意点
- 如果是通过代码添加Autolayout,那么必须在添加约束之前禁用Autoresizing
- 禁用Autoresizing时,必须是给谁添加就禁用谁的,也就是说如果禁用了父控件无效
- 添加约束之前,必须保证被约束的控件已经添加到父控件中了
1 | self.view.translatesAutoresizingMaskIntoConstraints = NO; |
通过VFL添加约束
基本使用
1 | /* |
注意点
- VFL语句中不支持乘除法
- 此时还是需要用最原始的方法(代码)来做
1 | /* |